- STAGE I
- FUNDAMENTALS OF INSTRUMENT FLIGHT
-
- Lesson #1. ORIENTATION FLIGHT AND REVIEW OF THE BASICS
-
- Start________________ N__________________
- End ________________ Date____ /____ /______
- Flight_______________ Ground ______________
- Pre & Post___________
-
- ________ (1) Preflight Discussion & Review Steep
(Constant Altitude) Turns, MCA, Stalls (VR & IR) and Recoveries from unusual flight
attitudes.
-
- ________ (2) Airplane Systems Related to IFR Operations,
Instrument Cockpit Check
-
- ________ (3) Aircraft Flight Instruments And Navigation
Equipment
-
- ________ (4) Straight And Level Flight
-
- ________ (5) Attitude Indicator Errors
-
- ________ (6) Review MCA
-
- ________ (7) Review Stalls (VR) & (IR)
-
- ________ (8) Review Unusual Attitude Recoveries
-
- ________ (9) Review Constant Airspeed Climbs & Descents
-
- ________ (10) Perform Steep Turns. Enter A Turn Of More Than
A Standard Rate (Altimeter is primary for pitch. Maintain altitude. Airspeed is primary
for power. Add power when airspeed indicator shows a need for it. Cross-check attitude
indicator, altimeter, and vertical speed indicator for pitch control. Refer to attitude
indicator when making pitch corrections, taking precession error into consideration.)
-
- ________ (11) Perform Steep Turns, Partial Panel (Use turn
needle to maintain a constant rate of turn. Control pitch by reference to altimeter/VSI
combination.)
-
- ________ (12) Recovery Should Be Smooth With A Normal Rate
Of Roll (Since vertical lift increases, pitch and power should be reduced as required to
maintain altitude and airspeed.)
-
- ________ (13) Practice Steep Turns With All Available
Instruments
-
- ________ (14) Without Attitude And HDG. Indicator
-
- ________(15) Postflight
-
- ________(16) Next Lesson Preview
-
-
- Lesson #2. INSTRUMENT COCKPIT CHECK & PITCH CONTROL
-
- Start________________ N__________________
- End ________________ Date____ /____ /______
- Flight_______________ Ground ______________
- Pre & Post___________
-
- ________ (1) Preflight Discussion
-
- ________ (2) Preflight Preparation
-
- ________ (3) Obtaining Weather
-
- ________ (4) Visual Inspection
-
- ________ (5) Airplane Systems Related To IFR Operations
-
- ________ (6) Cockpit Management
-
- ________ (7) Aircraft Flight Instruments And Navigation
Equipment
-
- ________ (8) Instrument Cockpit Check
-
- ________ (9) Straight And Level Flight
-
- ________(10) Attitude Indicator Errors
-
- ________(11) Comparison of Instrument Indication & Pitch
Attitude
-
- ________(12) Maintain Level Flight With Attitude Indicator,
Return To Level Flight (After moderate climbs & descents)
-
- ________(13) Trim
-
- ________(14) Change Pitch Attitude And Show Altimeter
Indication
-
- ________(15) Cross-check Attitude Indicator & Altimeter
-
- ________(16) Practice Maintaining Constant Altitude With
Altimeter And Attitude Indicator
-
- ________(17) Practice Returning To Original Altitude After
Loosing Or Gaining 50' (Change pitch attitude no more than 1/2 bar)
-
- ________(18) Vertical Speed Indicator Shows Trend Before
Altimeter Shows A Climb Or Descent
-
- ________(19) Caution Not To Chase Needle
-
- ________(20) Point Out That Relationship Between VSI &
Attitude Indicator Depends On Airspeed
-
- ________(21) Show A 200 FPM Climb Or Descent (At low
airspeed using 1/2 bar width on attitude indicator.)
-
- ________(22) Correct For Altitudes 100' Or Less With No More
Than 200 FPM Climb Or Descents
-
- ________(23) Practice Attitude Control With VSI Only
-
- ________(24) Practice Attitude Control With AI And VSI
-
- ________(25) Practice Attitude Control With AI, VSI And
Altimeter
-
- _________(26) Climb 100' At A Rate Of 200 FPM
-
- _________(27) Resume Level Flight, Descend At 200 FPM
-
- ________(28) Cross-Check ALT, AI, & VSI To Maintain
Level Flight
-
- ________(29) Point Out That Airspeed Remains Constant At
Constant Power When Altitude Is Constant
-
- ________(30) Make Small Pitch Changes, And Point Out Slow
Changes In Airspeed
-
- ________(31) Make Extreme Pitch Changes, And Point Out Fast
Changes In Airspeed
-
- ________(32) Practice Holding Constant Airspeed In Level
Flight (With Constant Power) By Use Of Airspeed Indicator Alone
-
- ________(33) Practice Constant Airspeed With All Available
Instruments
-
- ________(34) Now Without Attitude Indicator (Instructor
Should Aid Student In Rudder And Bank Control.)
-
-
- Lesson #3. BANK CONTROL
-
- Start________________ N__________________
- End ________________ Date____ /____ /______
- Flight_______________ Ground ______________
- Pre & Post___________
-
- ________ (1) Preflight Discussion
-
- ________ (2) Roll From One Bank To Another Observing Banking
Scale To Indicate Degree Of Bank
-
- ________ (3) Precession Of Horizon Bar After A Steep 180
Turn
-
- ________ (4) Practice Bank Control Using Attitude Indicator
Only Then Using Heading And Attitude Indicator
-
- ________ (5) Heading Indicator Corrections (Banks not to
exceed number of degrees turned. (Ex. if heading error is 10 degrees, do not exceed a 10
degree bank when correcting.)
-
- ________ (6) Include Heading Indicator In Cross-Check To
Maintain Straight-And Level Flight. Practice Straight Flight With Heading Indicator Alone,
Then Include Attitude Indicator
- ________ (7) Practice Straight Flight With All Pitch
Instruments
-
- ________ (8) Turn Needle Shows Rate Of Turn Regardless Of
Angle Of Bank (As a demonstration, fly along some straight ground reference, then
establish a banked attitude, using rudder to prevent any yaw or turn. Point out that turn
needle indicates straight flight and not banked attitude of aircraft.)
- ________ (9) Maintain Straight And Level Flight (Without
Heading Indicator) Use Turn Needle And Magnetic Compass Only
-
- ________(10) Demonstrate A 2 Degree Bank Showing Turn Needle
Deflection And Heading Indicator Changes
-
- ________(11) Make Standard Rate Turns, Slipping And
Skidding, (point out that ball on low side of center indicates that wing is low relative
to position of turn needle.)
- ________(12) Practice Bank Control Using Turn And Slip
Indicator (VR & IR)
-
- ________(13) Practice Maintaining Straight And Level Flight
With All Available Pitch And Bank Instruments
-
- ________(14) Postflight Procedures
-
- ________(15) Next Lesson Preview
-
- Lesson #4. POWER CONTROL AND TRIM
-
- Start________________ N__________________
- End ________________ Date____ /____ /______
- Flight_______________ Ground ______________
- Pre & Post___________
-
- ________ (1) Preflight Discussion
-
- ________ (2) Ground Phase
-
- ________ (3) Practice Maintaining Altitude And Trimming Off
Pressure
-
- ________ (4) Increase Power, Maintaining Straight &
Level Flight
-
- ________ (5) Decrease Power, Maintaining Straight &
Level Flight
-
- ________ (6) Use Aileron And/Or Rudder Trim, With Power
Changes (If aircraft is so equipped.)
-
- ________ (7) Determine Parameters For MAP, RPM, PITCH
SETTING, AIRSPEED, & VSI (Use power chart on next page.)
-
- ________ (8) Lead the Level-offs by 10 percent of the
Vertical Speed.
-
- ________ (9) Postflight
-
- ________(10) Next Lesson Preview
-
-
- Aircraft Performance Chart
- Aircraft N_____________________
-
- Start________________ N__________________
- End ________________ Date____ /____ /______
- Flight_______________ Ground ______________
- Pre & Post___________
-
- AIRSPEED VSI MAP RPM PITCH
-
-
- CLIMB
-
-
- CRUISE
-
-
- CRUISE
- DESCENT
-
-
-
- APPROACH &
- HOLDING
-
-
-
-
-
- APPROACH
- DESCENT
-
-
- NON-PRECISION.
- DESCENT
-
-
-
- NOTES:
-
-
- Lesson #5. CONSTANT AIRSPEED. CLIMBS AND DESCENTS
-
- Start________________ N__________________
- End ________________ Date____ /____ /______
- Flight_______________ Ground ______________
- Pre & Post___________
-
- ________ (1) Preflight Discussion
-
- ________ (2) Ground Phase
-
- ________ (3) Decrease Airspeed. From Cruise To Approaching
And Holding
-
- ________ (4) Increase Airspeed. From Approaching To Cruise
Maintaining Altitude & HDG. (Pitch must be changed, note attitude indicator
acceleration and deceleration errors.)
-
- ________ (5) Decrease Airspeed. From Cruise To Approach
Maintaining Altitude & HDG.
-
- ________ (6) Use Airspeed. Indicator For Primary Power
Control
-
- ________ (7) Practice Changing Airspeed. In Straight &
Level Flight Without HDG. Indicator, Then Without Attitude And HDG. Indicators
-
- ________ (8) Enter Constant Airspeed. Climb From Cruise
Airspeed.
-
- ________ (9) Demonstrate Use Of VSI As An Aid In Maintaining
Airspeed. (By adjusting pitch attitude on attitude indicator to change VSI 200 FPM to gain
or loose 10 Kts.)
-
- ________(10) Level-Off From Climbs At Cruise Airspeed. (Lead
altitude by 10 percent VSI shown, i.e., for 500 FPM, use 50 foot lead. (altimeter is
primary for pitch as level-off is started.) Leave power at climbing power until airspeed
approaches normal cruise airspeed, adjusting pitch as necessary to maintain altitude.
Emphasize proper use of trim.)
-
- ________(11) Enter Climbs From Normal Cruise Airspeed. And
Level Off At Normal Cruise Airspeed. With All Available Instruments, then Without Attitude
And HDG. Indicators.
-
- ________(12) Reduce To Climb Airspeed, And Enter A Climb
From Climb Airspeed. (As power is increased, airspeed is primary for pitch. Use
relationship between airspeed and vertical speed for pitch control.)
-
- ________(13) Level-Off From Climbs At Climb Airspeed. With
All Available Instruments (Lead altitude by 10 percent of VSI. As level-off is started,
altimeter becomes primary pitch.)
-
- ________(14) Practice Entering Climbs From Climb Airspeed.
And Level-Off At Climb Airspeed. (With all available instruments, then Without Attitude
And HDG. Indicators.)
-
- ________(15) Enter A Descent By Reducing To Descent Power,
Maintaining Altitude Until Airspeed. Approaches Descending Airspeed. (Airspeed. is primary
for pitch.)
-
- ________(16) Demonstrate Use Of VSI As An Aid In Maintaining
Desired Airspeed. (By adjusting pitch to change VSI 20 FPM to gain or lose 5 Kts.
airspeed.)
-
- ________(17) Level-Off From Descents At Cruise Airspeed.
(VSI is primary for pitch until normal lead for level-off is reached, then altimeter is
primary for pitch.)
-
- ________(18) Level-Off From Descents At Descent Airspeed.
(Approx. 50' above desired altitude, advance power to hold airspeed constant.
Simultaneously adjust pitch attitude to maintain airspeed. As level-off is started,
altimeter is primary for pitch, and airspeed becomes primary for power.)
-
- ________(19) Practice Level-Offs From Descents At Cruising
And Descending Airspeed. With Full & Partial Panel
-
- ________(20) Postflight Procedures
-
- ________(21) Next Lesson Preview
-
-
- Lesson #6. TURNS AND HDG. INDICATOR TURNS
-
- Start________________ N__________________
- End ________________ Date____ /____ /______
- Flight_______________ Ground ______________
- Pre & Post___________
-
- ________ (1) Preflight Discussion
-
- ________ (2) Ground Phase
-
- ________ (3) Enter A Level Flight Turn, And Maintain
Constant Airspeed. (As turn is established, attitude indicator is primary for bank.
When approximate desired bank is reached, turn needle is primary for bank.
altimeter is primary for pitch, airspeed indicator is primary for power.)
-
- ________ (4) Pitch Must Be Changed To Maintain Constant
Altitude
-
- ________ (5) If Necessary, Hold Slight Aileron And Rudder
Pressure Opposite Direction Of Turn To Maintain Desired Bank (Maintain a constant bank
angle.)
-
- ________ (6) Adjust Power As Necessary To Maintain A
Constant Airspeed.
-
- ________ (7) Recover To Straight And Level Flight (Explain
that roll-out is accomplished by reference to attitude indicator. When normal lead for
roll-out is reached, heading indicator if available, becomes primary for bank. Adjust
pitch attitude and power as necessary to maintain desired altitude and airspeed.)
- ________ (8) Enter A Turn With Rudder Alone (Show resulting
skid, and effect on airspeed. aircraft is turning faster than bank indicates.)
-
- ________ (9) Enter A Turn With Aileron Alone (Show yaw
caused by aileron drag, and how coordinated use of rudder and ailerons eliminates its
effect.
-
- ________(10) Find Angle Of Bank Needed For A Standard Rate
Turn (Divide airspeed by 10 and add 1/2 to answer, i.e., 100 divided by 10 + 5 = 15
Degrees Bank.)
-
- ________(11) Turns Low Cruise Speed
-
- ________(12) Turns Normal Cruise Speed
-
- ________(13) Turns High Cruise Speed
-
- ________(14) Practice Turns With Inoperative Gyroscopic
Attitude & HDG. Indicators
-
- ________(15) Practice Climbing And Descending Turns, With
Level-Offs At Various Airspeeds, Full Panel
-
- ________(16) Practice Climbing And Descending Turns Without
Gyroscopic HDG. And Attitude Indicator
-
- ________(17) Turns To Predetermined Headings (With a rollout
lead of 1 degree for each 2 degrees of bank being held. Never exceed in bank number of
degrees to be turned. Never exceed a standard rate turn.)
-
- ________(18) Without Attitude Indicator, Change HDG. 30
Degrees (Use a standard rate turn.)
-
- ________(19) Practice Changing HDG. Less Than 15 Degrees
-
- ________(20) Practice Turns To Various Headings With All
Instruments & Without Attitude Indicator
-
- ________(21) Postflight
-
- ________(22) Next Lesson Preview
-
- ________(23) Quiz 1
-
- Notes:
-
-
- Lesson #7. INSTRUMENT TAKEOFF
-
- Start________________ N__________________
- End ________________ Date____ /____ /______
- Flight_______________ Ground ______________
- Pre & Post___________
-
- ________ (1) Preflight Discussion
-
- ________ (2) Ground Phase
-
- ________ (3) Instrument Takeoffs. Hold aircraft stationary
with brakes and advance power to a setting that will provide partial rudder control.
Advance throttle smoothly to obtain rudder effectiveness, then release brakes and apply
full power. Heading indicator is primary for directional control. Climb-out is made at a
constant airspeed.)
-
- ________ (4) Practice Instrument Takeoffs Without Hood
-
- ________ (5) Practice Instrument Takeoffs With Hood
-
-
- Lesson #8. RATE CLIMBS AND DESCENTS
-
- Start________________ N__________________
- End ________________ Date____ /____ /______
- Flight_______________ Ground ______________
- Pre & Post___________
-
- ________ (1) Preflight Discussion
-
- ________ (2) Instrument Takeoff
-
- ________ (3) Climb At A Definite Indicated Rate (From climb
airspeed, advance power to establish climb at 500'/min. Simultaneously adjust pitch to
maintain constant airspeed. Log power setting required for this.)
-
- ________ (4) Level Off From A Climb At A Definite Indicated
Rate (Follow same procedure that was described for level-offs from constant airspeed
climbs.)
-
- ________ (5) Enter A Descent At A Definite Indicated Rate
(Adjust pitch attitude to maintain a constant airspeed. Log power setting required for
this.)
-
- ________ (6) Level Off From A Descent At A Definite
Indicated Rate (Follow he same procedure that was described for level-offs from constant
airspeed descents.)
-
- ________ (7) Calibrating VSI To Establish Definite Absolute
Rates (By establishing a climb or descent of 500'/min.
-
- ________ (8) Practice Calibrating VSI During Both Climbs And
Descents
-
- ________ (9) Climbs At A Definite Absolute Rate (Establish
climbing airspeed. As clock passes a cardinal point, enter climb using same technique that
has been described for entry into a climb at a definite indicated rate. Use first 30 sec.
to establish proper vertical speed and trim. Check clock and altimeter every 15 sec.
thereafter for 125 feet of altitude change. Show student how to correct any errors.)
-
- ________(10) Level-Offs From Climb At A Definite Absolute
Rate (Follow same procedure that was described for level-off from a constant airspeed
climb.)
-
- ________(11) Postflight
-
- ________(12) Next Lesson Preview
-
- Notes:
-
-
- Lesson #9. CHANGE OF AIRSPEED. IN TURNS
-
- Start________________ N__________________
- End ________________ Date____ /____ /______
- Flight_______________ Ground ______________
- Pre & Post___________
-
- ________ (1) Preflight Discussion
-
- ________ (2) Instrument Takeoff
-
- ________ (3) Change From Normal To Low Cruise Airspeed.
(After Turn Is Established Altimeter is primary for pitch, turn needle is primary for
bank. While airspeed is changing, MAP or TACH is primary for power. Trim as airspeed
changes.)
-
- ________ (4) Change From Low To Normal Cruise After Turn Is
Established (Same as above, except power must be overshot 3" to 5" (200 - 300
RPM), pitch is lowered to maintain altitude, bank is increased to maintain standard rate
turn.)
- ________ (5) Change Airspeed. And Enter Turn Simultaneously
-
- ________ (6) Practice Changing Airspeed. In Turns After Turn
Is Established
-
- ________ (7) Practice Changing Airspeed. In Turns Entering
Turn And Changing Airspeed. Simultaneously (With all available instruments, and without
attitude and heading indicators.)
-
- ________ (8) Postflight, Lesson Preview
-
-
- Lesson #10. CLIMBS AND DESCENTS TO
- PREDETERMINED ALTITUDES AND HEADINGS.
- Start________________ N__________________
- End ________________ Date____ /____ /______
- Flight_______________ Ground ______________
- Pre & Post___________
-
- ________ (1) Preflight Discussion
-
- ________ (2) Instrument Takeoff
-
- ________ (3) Change To Climbing Airspeed. In
Straight-And-Level Flight
-
- ________ (4) When Clock Second Hand Indicates A Cardinal
Point Change Pitch, Bank And Power Simultaneously, And Enter A Standard Rate Climbing Turn
-
- ________ (5) Control Bank As In Timed Turns, Checking HDG.
Every 15 Sec. After 1st 30 Seconds
-
- ________ (6) Control Pitch As In Rate Climbs, Checking
Altitude Every 15 Sec. After 1st 30 Seconds
-
- ________ (7) Roll Out On Correct HDG. And Level-Off On
Correct Altitude Regardless Of Time
-
- ________ (8) Descend To A Predetermined Altitude And HDG.
-
- ________ (9) Practice without attitude and heading
indicators.)
-
- ________(10) Postflight
-
- ________(11) Next Lesson Preview
-
-
- Lesson #11. VERTICAL S, S1 & S2
-
- Start________________ N__________________
- End ________________ Date____ /____ /______
- Flight_______________ Ground ______________
- Pre & Post___________
-
- ________ (1) Preflight Discussion
-
- ________ (2) Instrument Takeoff
-
- ________ (3) Vertical S (From an exact altitude and climbing
or descending airspeed., adjust power and pitch to enter a climb or descent. As Power is
adjusted in entry, airspeed. is primary for pitch. As VSI approaches 500 FPM, VSI becomes
primary for pitch and remains so until reversal of vertical direction is started. As VSI
reaches 500 FPM airspeed. again becomes primary for power. As reversal of VSI is started,
airspeed. becomes primary for pitch and remains so until VSI approaches desired rate of
500 FPM. Trim and Cross-Check are important.)
-
- ________ (4) Vertical S-1 (Enter in a climbing or descending
turn.)
-
- ________ (5) Reverse Direction Of Turn With Each Return To
Entry Altitude.
-
- ________ (6) VERTICAL S-2 (direction of turn is reversed
with each reversal of vertical direction.)
-
- ________ (7) V. S, S1, and S-2 (With all instruments, &
without AI.
-
- ________ (8) Postflight, Lesson Preview
-
-
- Lesson #12. MAGNETIC COMPASS
- Start________________ N__________________
- End ________________ Date____ /____ /______
- Flight_______________ Ground ______________
- Pre & Post___________
-
- ________ (1) Preflight Discussion includes North Undershoot
= Latitude + 1/2 the bank angle. South Overshoot = Latitude + 1/2 the bank angle.
-
- ________ (2) Review As Necessary
-
- ________ (3) Demonstrate Northerly Turning Error (Fly north
long enough for compass to settle down, wings level. Enter a turn to west. compass
immediately indicates a turn in opposite direction. Return to a north heading. Enter a
turn to east. compass indicates a turn to west. Return to a north heading.)
-
- ________ (4) Enter A Very Shallow Banked Turn To West
(Compass indicated momentarily that a straight course is being maintained. Wings must be
level to avoid turning errors. Repeat demonstration in a shallow turn to east.)
-
- ________ (5) Enter A Steep Turn (compass lags excessively,
and may swing completely around in opposite direction of turn.)
-
- ________ (6) Demonstrate Southerly Turning Error (Fly a
south heading and let compass settle down. Enter a turn to west. compass indicates a much
faster turn in same direction. Return to south heading. Enter a turn to east. compass
indicates a much faster turn in same direction. Return to a south heading. Wings must be
level to avoid compass turn errors.)
-
- ________ (7) Acceleration & Deceleration Error With
Power Changes (Fly a heading of east. Increase airspeed in level flight. Compass indicates
a turn toward north. Reduce airspeed in level flight. Compass indicates a turn toward
south.)
-
- ________ (8) Acceleration & Deceleration Error Constant
Power (Fly a heading of east or west. At a constant power setting first lower, then raise
nose.)
-
- ________ (9) Fly A HDG. Of West, And Repeat Above
Demonstration (magnitude of error depends on rate of acceleration or deceleration. To read
compass accurately, airspeed must be constant. Acceleration and deceleration error are not
present in constant airspeed climbs and descents.)
-
- ________(10) Show That Acceleration And Deceleration Errors
Are Not Present On North And South Headings
-
- ________(11) Show That Turn Errors Are Not Present On East
And West Headings
-
- ________(12) Turns To Magnetic Compass Headings (Turn to a
heading of north, using 15 to 18 degrees of bank. Lead heading an amount equal to latitude
plus half angle of bank. Repeat same, turning to a heading of south (15 to 18 degrees of
bank. Overshoot heading an amount equal to latitude minus half angle of bank.)
-
- ________(13) From South, Then From North, Turn To A HDG. Of
East (Lead heading approx. 5 degrees when turning from a heading of south to east, and
approx. 10 degrees when turning from a heading of north to east.)
-
- ________(14) Turn To A HDG. Of West, Using Procedure Given
Above
-
- ________(15) Show That Lag Or Lead Must Be Interpolated When
Turning To Intermediate Headings
-
- ________(16) Practice Making Turns To Magnetic Compass
Headings Without HDG. Indicator, Then Without HDG. Indicator And Attitude Indicator
-
- ________(17) Postflight
-
- ________(18) Next Lesson Preview
-
-
- Lesson #13. TIMED TURNS
-
- Start________________ N__________________
- End ________________ Date____ /____ /______
- Flight_______________ Ground ______________
- Pre & Post___________
-
- ________ (1) Preflight Discussion
-
- ________ (2) Review As Necessary
-
- ________ (3) Calibration Of Turn Needle (With all
instruments available, establish a standard rate turn as indicated by turn needle. As
clock second hand passes a cardinal point, check heading indicator for a turn of 30
degrees each 10 seconds (no lag, since timing is started after turn is established). Make
necessary changes in indicated rate (needle position) to produce a standard rate turn.)
-
- ________ (4) Calibrate Needle Both Right And Left
-
- ________ (5) Note Exact Deflection Of Turn Needle And Use
Corrected Deflection (If any) For All Timed Turns
-
- ________ (6) Timed Turns With All Instruments Available
(Enter a standard rate turn when clock second hand passes a cardinal point. first 30
second is used to establish turn properly. check heading indicator to see whether rate of
turn is proper. It should indicate a turn of 90 degrees minus number of degrees lag for
angle of bank used (LAG WILL BE APPROX. ONE-HALF DEGREE OF BANK.) Demonstrate how angle of
bank is increased or decreased to compensate for any error. After first 30 seconds,
heading indicator should be checked against clock every 15 seconds. Time is started when
pressure is applied to roll into a turn and stopped when pressure is applied to roll out.
With all instruments available, roll out on desired heading regardless of time.)
-
- ________ (7) Timed Turns Without HDG. Indicator And Attitude
Indicator (Enter a standard rate turn using needle as primary bank instrument while in a
turn. Turn for 30 seconds, holding a constant turn needle deflection. At end of 30
seconds, roll out of turn at same rate you made roll-in. When wings are level and turn
needle is centered, magnetic compass should indicate a turn of 90 degrees. For small
changes in heading use a half-standard-rate turn. (1/2 NEEDLE WIDTH ON 2 MIN. NEEDLE, OR 1
NEEDLE WIDTH ON 4 MINUTE NEEDLE.))
-
- ________ (8) Practice Making Timed Turns At Different
Airspeeds (With all available instruments.)
-
- ________ (9) Without HDG. Indicator
-
- ________(10) Without HDG. Indicator And Attitude Indicator
-
-
- Lesson #14. RECOVERY FROM UNUSUAL FLIGHT ATTITUDES
- Start________________ N__________________
- End ________________ Date____ /____ /______
- Flight_______________ Ground ______________
- Pre & Post___________
-
- ________ (1) Preflight Discussion Rules Airspeed Needle
Increasing:
- Close Throttle.
- Level Wings.
- Increase Pitch.
-
- Airspeed Needle Decreasing:
- Full Throttle.
- Decrease Pitch.
- Level Wings.
-
- ________ (2) Review As Necessary
-
- ________ (3) Practice Recovery From Nose-Low Unusual
Attitudes With All Available Instruments
-
- ________ (4) Now Without Attitude And HDG. Indicator
-
- ________ (5) Practice Recovery From Nose-High Unusual
Attitudes With All Available Instruments
-
- ________ (6) Without Attitude And HDG. Indicator
-
- ________ (7) Postflight
-
- ________(8) Next Lesson Preview
-
- NOTES:
-
-
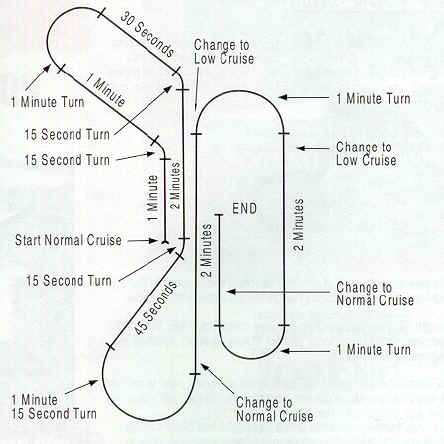
- Pattern "A"
-
- Lesson #15. PATTERN "A"
- Start________________ N__________________
- End ________________ Date____ /____ /______
- Flight_______________ Ground ______________
- Pre & Post___________
-
- ________ (1) Preflight Discussion (purpose of this pattern
is to further develop ability to control aircraft without deliberate thought. These
patterns help prepare student for holding patterns and procedure turns. Initial practice
should be on cardinal headings for simplicity.
- ________ (2) Review As Necessary
-
- ________ (3) Maneuver Should Be First Performed With All
Available Instruments, Then On Partial Panel
-
- ________ (4) Demonstrate First Three Turns, Then Have
Student Continue (Timing should start when clock is on a cardinal point, preferably 12
o'clock position.)
-
- ________ (5) Timing Is Consecutive In That Time For Each Leg
Is Started When Control Pressure Is Applied To Recover From Preceding Turn
-
- ________ (6) After Recovery From Turns, Allow Sufficient
Time For Compass To Stop Oscillating, Then Note HDG. And Correct If Necessary (An
exception is 30 Sec. leg. If you note an error in heading here, compensate for it by
lengthening or shortening time allotted for next turn.)
-
- ________ (7) Observe Turn Needle And Magnetic Compass
Closely (To correct a heading, use a timed turn. For small heading changes use
half-standard rate turns. Efficient Cross-Check is required during airspeed changes so
that corrections may be applied immediately.)
-
- ________ (8) Perform Pattern Without Attitude And HDG.
Indicator
-
- ________ (9) Postflight
-
- ________(10) Next Lesson Preview
-
- NOTES:
-
-
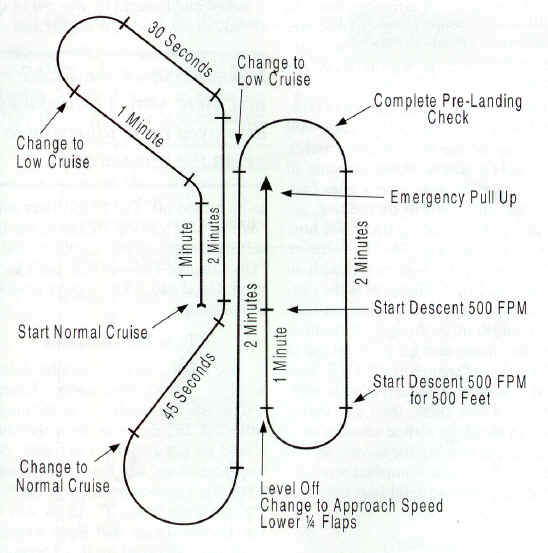
- Pattern "B"
-
- Lesson #16. PATTERN "B"
- Start________________ N__________________
- End ________________ Date____ /____ /______
- Flight_______________ Ground ______________
- Pre & Post___________
-
- ________ (1) Preflight Discussion (Pattern "B"
like previous one, is to further develop pilot's ability to control aircraft without
deliberate thought. These patterns help prepare student for holding patterns and procedure
turns. Initial practice should be on cardinal headings for simplicity.
-
- ________ (2) Use All Available Instruments (Do not
demonstrate unless absolutely necessary.)
-
- ________ (3) Roll Out On Headings Regardless Of Time (When
changing airspeed in turns, simultaneously change bank and power, also change pitch, if
applicable.)
-
- ________ (4) Descending Final Turn Is Made At An Absolute
Rate
-
- ________ (5) Final Descent Is Made To A Minimum Altitude (As
set by instructor, or until time expires, whichever comes first.)
-
- ________ (6) Emergency pull-up Is Made As A Normal Go-Around
Procedure, Climbing To Original Altitude
-
- ________ (7) Postflight. Quiz 2
-
- STAGE 2 Only after successful completion of these lessons.
IFR Flight Training
Syllabus Index